Developing a new Zowe CLI plug-in
Developing a new Zowe CLI plug-in
Before you begin, complete the Extending an existing plug-in tutorial.
Overview
The advantage of Zowe CLI and of the CLI approach in mainframe development is that it allows for combining different developer tools for new and interesting uses.
This tutorial demonstrates how to create a brand new Zowe CLI plug-in that uses Node.js to create a client-side API.
After following all the steps, you will have created a data set diff utility plug-in called Files Util Plug-in. This plug-in takes in any two data sets, or files, and returns a plain text output in the terminal showing how they differ. This tutorial also shows you how you can integrate your new plug-in with a third-party utility to make your output colorful and easier to read, as shown in the image at the bottom of this page.
If you are ready to create your own unique Zowe CLI plug-in, refer to the notes at the end of each tutorial step for guidance.
If you are interested in creating a credential manager plug-in, see the Zowe CLI secrets for kubernetes plug-in repository.
Setting up the new sample plug-in project
Download the sample plug-in source and delete the irrelevant content to set up your plug-in project:
-
Open a terminal and run the command
mkdir zowe-tutorial.noteAll the files created through this tutorial are saved in this tutorial directory.
-
Enter
cd zowe-tutorialto change directory into yourzowe-tutorialfolder. -
Download the source code zip file from the Zowe CLI sample plug-in repository.
-
In your File Explorer, extract the zip file to the
zowe-tutorialfolder. -
Rename the
zowe-cli-sample-plugin-masterdirectory tofiles-util.This is the project directory used throughout the rest of this tutorial.
-
Delete all content within the following folders:
src/apisrc/clidocsfolders__tests__/__system__/api__tests__/__system__/cli__tests__/api__tests__/cli
-
Return to your terminal and run
cd files-utilto enter the project directory. -
Enter
git initto set up a new Git repository. -
Enter
git add --allto stage (track) all files in the current directory with Git. -
Enter
git commit --message "Initial commit"to save a snapshot of the staged files in your repository. -
Run
npm installto install third-party dependencies defined in thepackage.jsonfile of your Node.js project.When successful, a progress bar displays. Once the plug-in is installed, a message displays the status of the packages in the
node_modulesdirectory.noteIf vulnerabilities are found in any of the installed dependencies, refer to npm Docs for how to fix them.
Change the files-util directory to a name applicable for your project.
Updating package.json
Change the name property in the package.json file to the plug-in name.
Open the package.json file in a text editor and replace the name field with the following information:
"name": "@zowe/files-util",
This tutorial uses @zowe/files-util as the tutorial plug-in name.
Replace @zowe/files-util with a unique plug-in name. This allows you to publish the plug-in under that name to the npm registry in the future. For information regarding npm scoping, see the npm documentation.
Adjusting Imperative CLI Framework configuration
Define json configurations for the plug-in to Imperative.
Change the src/pluginDef.ts file to contain the following configurations:
import { IImperativeConfig } from "@zowe/imperative";

const config: IImperativeConfig = {
    commandModuleGlobs: ["**/cli/*/*.definition!(.d).*s"],
    rootCommandDescription: "Files utility plugin for Zowe CLI",
    productDisplayName: "Files Util Plugin",
    name: "files-util"
};

export = config;
When successful, the src/pluginDef.ts file contains the new configurations.
Change the plug-in name, display name, and description according to your project.
Adding third-party packages
Install third-party packages as dependencies for the plug-in's client-side API:
-
Run
npm install --save-exact diffto install the diff package (which includes methods for comparing text). -
Run
npm install --save-dev @types/diffto install the typescript type definitions for the diff package as a development dependency.When successful, the
diffand@types/diffpackages are added to the dependency list in thepackage.jsonfile.
Instead of the diff package, install the package(s) that are required for your API, if any.
Creating a Node.js client-side API
Create a client-side API that compares the contents of two data sets on the mainframe:
-
In the
src/apidirectory, create a file namedDataSetDiff.ts. -
Copy and paste the following code into the
DataSetDiff.tsfile:import { AbstractSession } from "@zowe/imperative";
import { Download, IDownloadOptions, IZosFilesResponse } from "@zowe/cli";
import * as diff from "diff";
import { readFileSync } from "fs";
export class DataSetDiff {
public static async diff(session: AbstractSession, oldDataSet: string, newDataSet: string) {
let error;
let response: IZosFilesResponse;
const options: IDownloadOptions = {
extension: "dat",
};
try {
response = await Download.dataSet(session, oldDataSet, options);
} catch (err) {
error = "oldDataSet: " + err;
throw error;
}
try {
response = await Download.dataSet(session, newDataSet, options);
} catch (err) {
error = "newDataSet: " + err;
throw error;
}
const regex = /\.|\(/gi; // Replace . and ( with /
const regex2 = /\)/gi; // Replace ) with .
// convert the old data set name to use as a path/file
let file = oldDataSet.replace(regex, "/");
file = file.replace(regex2, ".") + "dat";
// Load the downloaded contents of 'oldDataSet'
const oldContent = readFileSync(`${file}`).toString();
// convert the new data set name to use as a path/file
file = newDataSet.replace(regex, "/");
file = file.replace(regex2, ".") + "dat";
// Load the downloaded contents of 'oldDataSet'
const newContent = readFileSync(`${file}`).toString();
return diff.createTwoFilesPatch(oldDataSet, newDataSet, oldContent, newContent, "Old", "New");
}
} -
In the
srcdirectory, replace the contents of theindex.tsfile with the following code in order to make the API available for other developers to import:export * from "./api/DataSetDiff";When successful, the
index.tsfile contains the new code.
The file name and code in Step 2 may be entirely different if you want to implement an API to do something else.
Building your plug-in source
Confirm that your project builds successfully:
-
Due to missing license headers, you will come across linting errors. Run
npm run lint:fixto resolve the errors automatically.When successful, no errors are returned, although an unrelated warning might display. Additionally, the
libdirectory contains the built javascript files. -
In the terminal, run
npm run buildto verify there are no errors.This command builds your typescript files by looking at the configuration details in
tsconfig.jsonand placing the output javascript files in thelibdirectory.The
libdirectory is configurable by modifying this value in thetsconfig.jsonfile.
Follow these same steps.
Creating a Zowe CLI command
To define the command that calls the client-side API:
-
In
src/cli, create a folder nameddiff. -
In the
diffdirectory, create a file namedDiff.definition.ts. -
Copy and paste the following code into the
Diff.definition.tsfile:import { ICommandDefinition } from "@zowe/imperative";
import { DataSetsDefinition } from "./data-sets/DataSets.definition";
const IssueDefinition: ICommandDefinition = {
name: "diff",
summary: "Diff two data sets content",
description: "Uses open source diff packages to diff two data sets content",
type: "group",
children: [DataSetsDefinition]
};
export = IssueDefinition; -
In the
difffolder, create a folder nameddata-sets. -
In the
data-setsfolder, create the following two files:DataSets.definition.tsDataSets.handler.ts
-
Copy and paste the following code into the
DataSets.definition.tsfile:import { ICommandDefinition } from "@zowe/imperative";
export const DataSetsDefinition: ICommandDefinition = {
name: "data-sets",
aliases: ["ds"],
summary: "data sets to diff",
description: "diff the first data set with the second",
type: "command",
handler: __dirname + "/DataSets.handler",
positionals: [
{
name: "oldDataSet",
description: "The old data set",
type: "string"
},
{
name: "newDataSet",
description: "The new data set",
type: "string"
}
],
profile: {
optional: ["zosmf"]
}
}; -
Copy and paste the following code into the
DataSets.handler.tsfile:import { ConnectionPropsForSessCfg, ICommandHandler, IHandlerParameters, ISession, Session } from "@zowe/imperative";
import { DataSetDiff } from "../../../api/DataSetDiff";
export default class DataSetsDiffHandler implements ICommandHandler {
public async process(params: IHandlerParameters): Promise<void> {
const sessCfg: ISession = {
hostname: params.arguments.host,
port: params.arguments.port,
basePath: params.arguments.basePath,
rejectUnauthorized: params.arguments.rejectUnauthorized,
protocol: params.arguments.protocol || "https"
};
const sessCfgWithCreds = await ConnectionPropsForSessCfg.addPropsOrPrompt<ISession>(sessCfg, params.arguments,
{ doPrompting: true, parms: params });
const session = new Session(sessCfgWithCreds);
const resp = await DataSetDiff.diff(session, params.arguments.oldDataSet, params.arguments.newDataSet);
params.response.console.log(resp);
}
}When successful, the
Diff.definition.ts,DataSets.definition.ts, andDataSets.handler.tsfiles contain the new code.
If you are adding multiple commands to your CLI plug-in, consider moving the code that creates a session into a base handler class that can be shared across multiple commands. See the sample plugin code for an example of how this can be done.
Refer to file names specific to your project. Your code likely follows the same structure, but command name, handler, definition, and other information would differ.
Trying your command
Before you test your new command, confirm that you are able to connect to the mainframe.
In order for the client-side API to reach the mainframe (to fetch data sets), Zowe CLI needs a z/OSMF profile for access. See Team configurations for information.
Once the connection between Zowe CLI and z/OSMF is confirmed, build and install the plug-in before running it for the first time:
-
Repeat the steps in Building your plug-in source.
As you make changes, repeat these steps to make sure the changes are reflected in the working plug-in.
-
Issue the following command to install Files Util Plug-in into Zowe CLI:
zowe plugins install .A success message displays if installed correctly.
noteIf you encounter installation errors due to conflicting profiles or command groups, uninstall the sample plug-in or modify the profile definition in the
src/pluginDef.tsfile. -
Replace the data set names with valid mainframe data set names on your system:
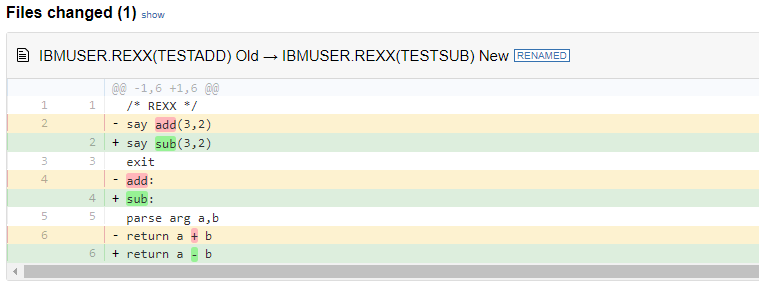
zowe files-util diff data-sets "IBMUSER.REXX(TESTADD)" "IBMUSER.REXX(TESTSUB)"The raw diff output displays as a command response:
$ zowe files-util diff data-sets "IBMUSER.REXX(TESTADD)" "IBMUSER.REXX(TESTSUB)"
===================================================================
--- IBMUSER.REXX(TESTADD)        Old
+++ IBMUSER.REXX(TESTSUB)        New
@@ -1,6 +1,6 @@
/* REXX */
-say add(3,2)
+say sub(3,2)
exit
-add:
+sub:
parse arg a,b
-return a + b
+return a - b
When successful, the output displays plain text diffs of the entered data sets.
Use Step 3 to run your new command. Note that the command is different based on the plug-in name in the src/pluginDef.ts file.
Bringing together new tools
You have created a simple CLI plug-in that provides plain text diffs of two data sets. But you may not want to end there.
Depending on the complexity of your changes, it can be difficult to identify data set differences with plain text.
To help fix this, you can extend Files Util Plug-in to create a more visual output. For this tutorial, use diff2html to generate side-by-side diffs that make it easier to compare changes, as seen in the image below.
 |
|---|
| Diff to HTML by rtfpessoa |
-
Run
npm install --global diff2html-clito installdiff2html.noteZowe is not associated with
diff2html-cli. -
To pipe your Zowe CLI plug-in output to
diff2html, run the following command with your information:zowe files-util diff data-sets "IBMUSER.REXX(TESTADD)" "IBMUSER.REXX(TESTSUB)" | diff2html -i stdinWhen successful, this launches a web browser that displays side-by-side diffs using HTML.
For a unique plug-in, consider integrating with more modern tools that make outputs easier to read or manage, or that can use outputs in scripts.
Next steps
Try the Implementing profiles in a plug-in tutorial to learn about defining new profiles with your plug-in.