Installing the z/OS Build via Convenience Build (PAX file)
Installing the z/OS Build via Convenience Build (PAX file)
You can install the Zowe™ convenience build by obtaining a PAX file which is used to create the Zowe runtime environment.
Introduction
The Zowe installation file for Zowe z/OS components is distributed as a PAX file that contains the runtimes and the scripts to install and launch the z/OS runtime. You must first obtain the PAX file and transfer this file to z/OS. To install, configure, and start Zowe, use the zwe command. This command defines help messages, logging options, and more. For details about how to use this command, see the ZWE Server Command Reference.
The configuration data that is read by the zwe command are stored in a YAML configuration file named zowe.yaml. Modify the zowe.yaml file based on your environment.
Complete the following steps to install the Zowe runtime.
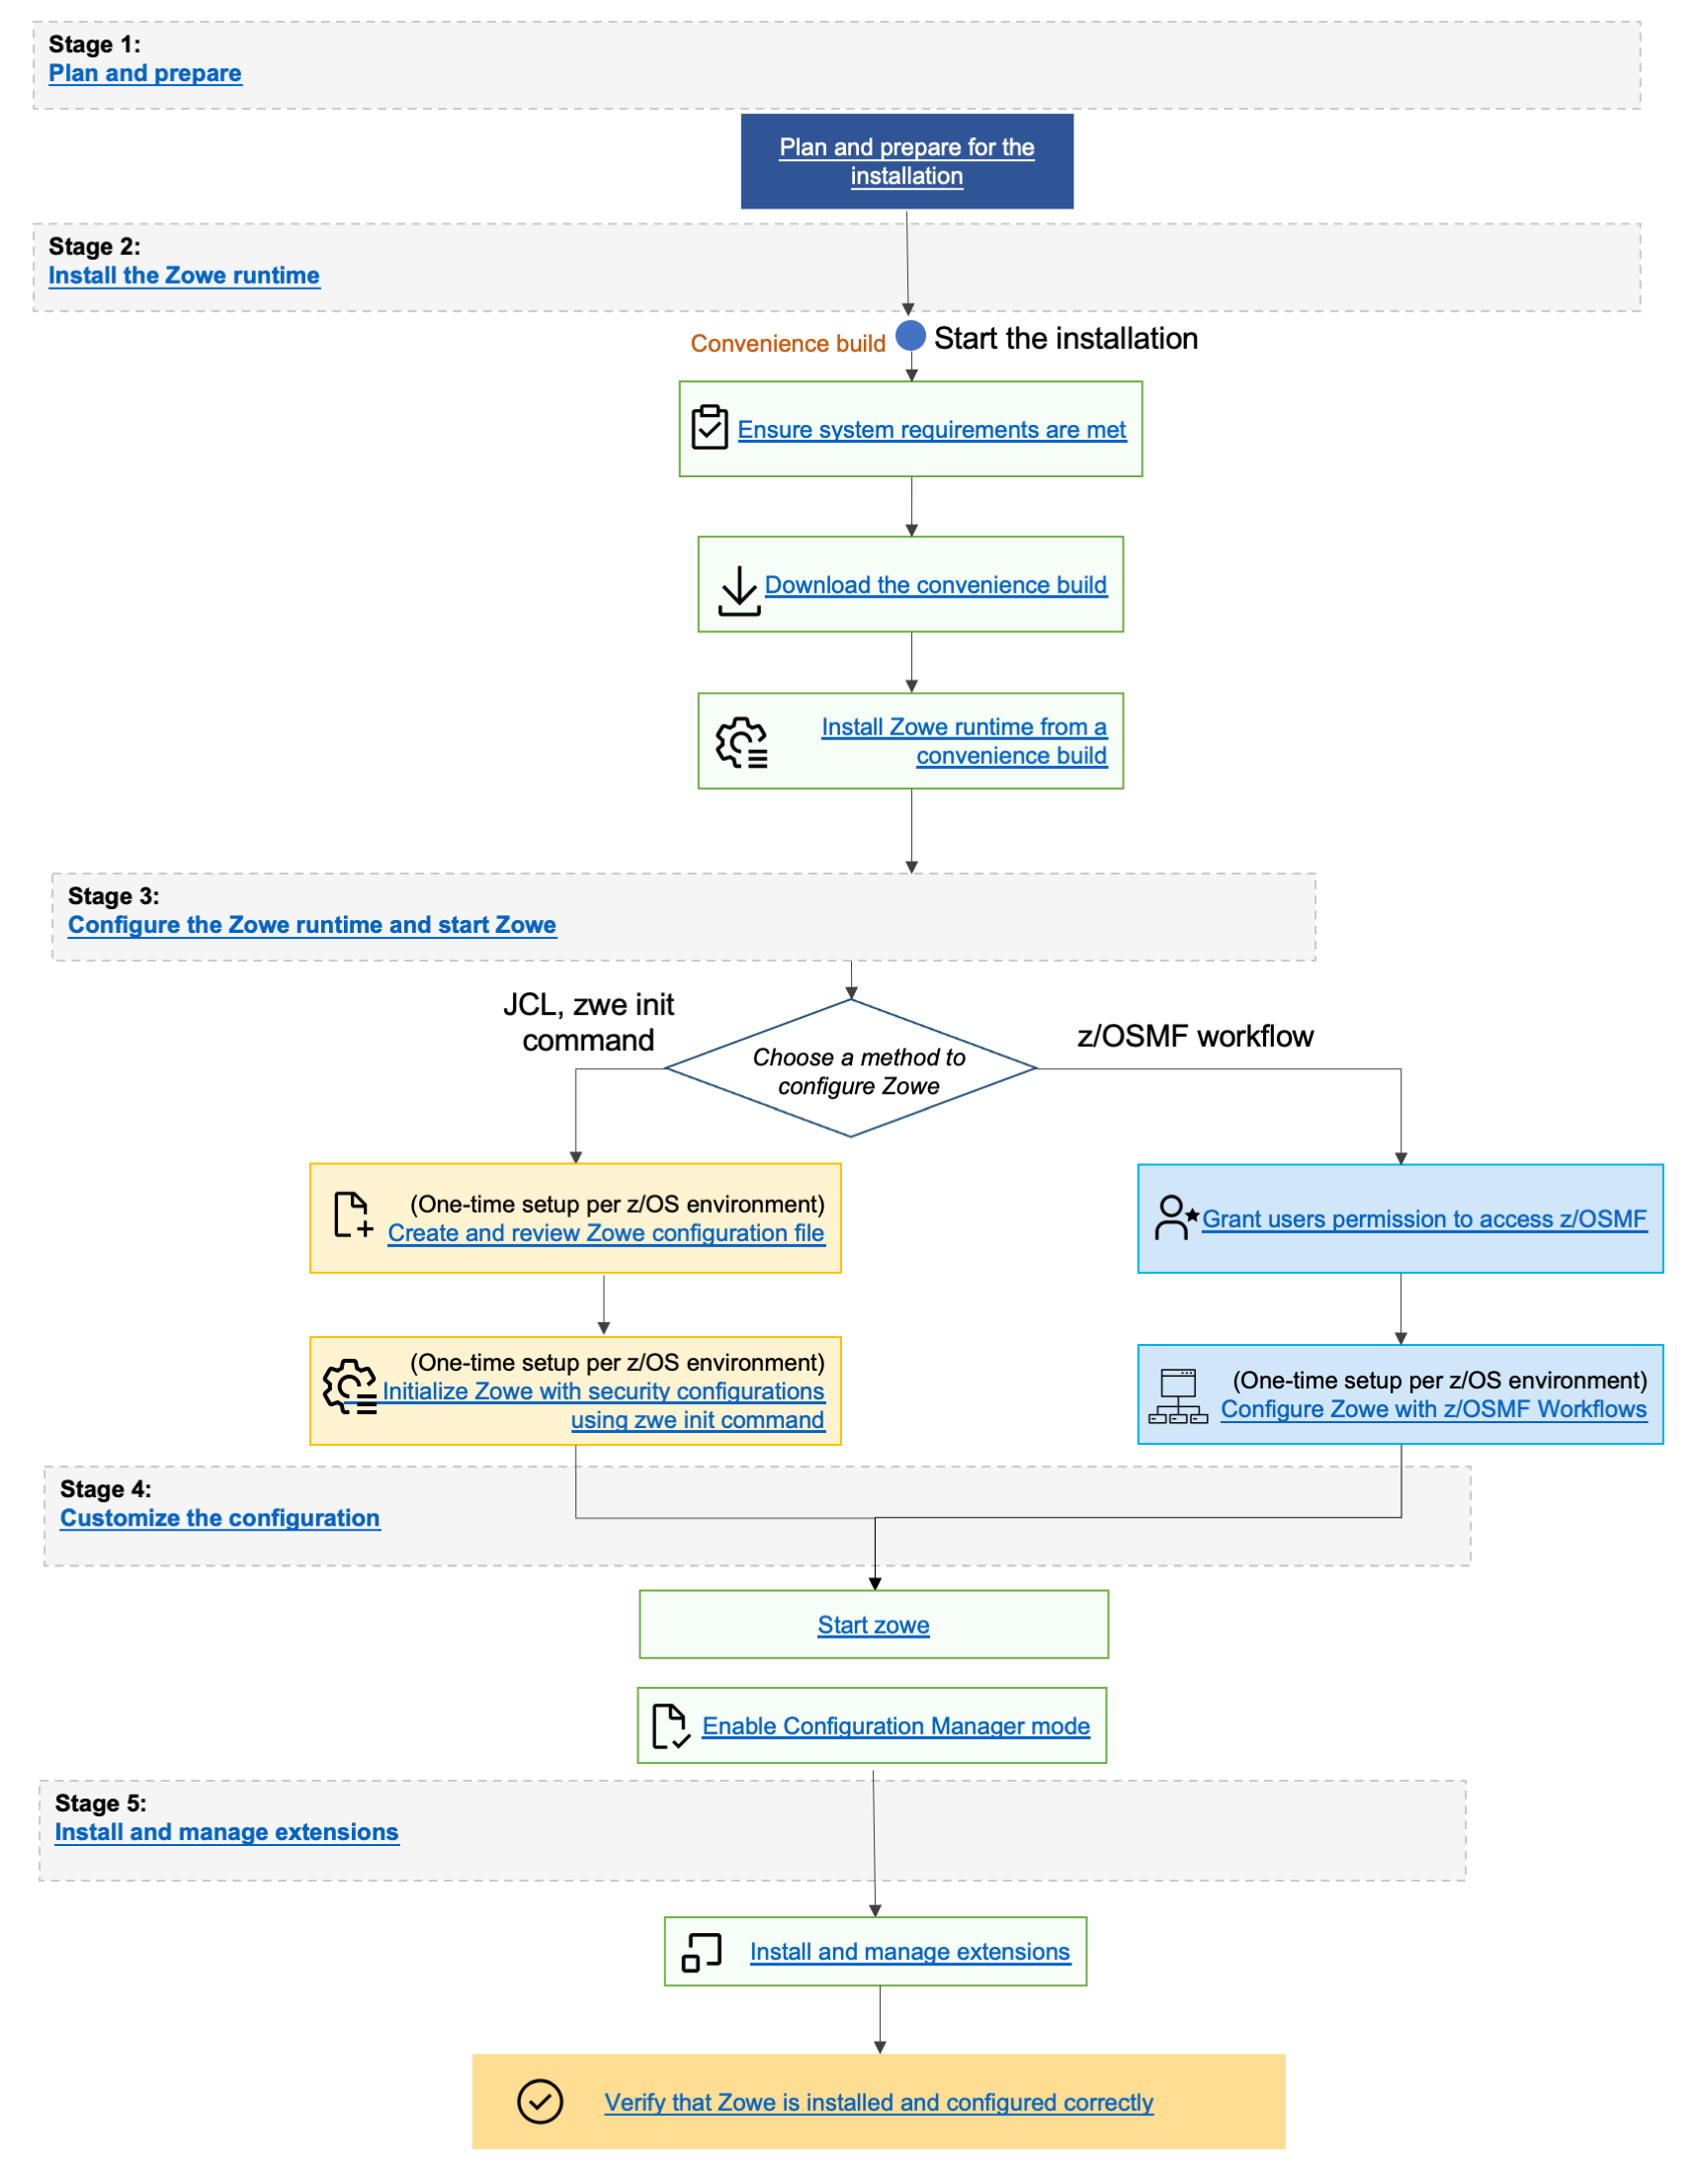
End-to-end installation diagram
Step 1: Obtain the convenience build
- To download the PAX file, open your web browser on the Zowe Download website.
- Navigate to Zowe V3 -> Zowe 3.v.p z/OS Convenience build section, and select download the v3 convenience build.
Step 2: Transfer the convenience build to USS and expand it
After you download the PAX file, transfer the file to z/OS and expand the file contents.
-
Open a terminal in Mac OS or Linux, or command prompt in Windows OS, and navigate to the directory where you downloaded the Zowe PAX file.
-
Connect to z/OS using SFTP. Issue the following command:
sftp <userID@ip.of.zos.box>If SFTP is not available or if you prefer to use FTP, you can issue the following command instead:
ftp <userID@ip.of.zos.box>bin -
Navigate to the target directory that you want to transfer the Zowe PAX file into on z/OS.
Note: After you connect to z/OS and enter your password, enter the UNIX file system. The following commands are useful:
- To see what directory you are in, type
pwd. - To switch directory, type
cd. - To list the contents of a directory, type
ls. - To create a directory, type
mkdir.
- To see what directory you are in, type
-
When you are in the directory you want to transfer the Zowe PAX file into, issue the following command:
put <zowe-V.v.p>.paxzowe-V.v.p
Specifies the name of the PAX file you downloaded.
Note: When your terminal is connected to z/OS through FTP or SFTP, you can prepend commands with
lto have them issued against your desktop. To list the contents of a directory on your desktop, typellswherelslists contents of a directory on z/OS.tipYou can simplify
sftpusage for the existing directory with the following command:echo 'put <zowe-V.v.p>.pax' | sftp userID@ip.of.zos.box:/path/to/zowe/runtimeAfter the PAX file successfully transfers, exit your
sftporftpsession. -
Use
cdto move into the high level directory where you want the code to be installed.Note: The directory may be
/usr/lpp/zowe -
Open a USS shell to expand the PAX file. THe command environment can be any of the following options:
- ssh terminal
- OMVS
- iShell
- Any other z/OS USS command environment.
-
Expand the PAX file by issuing the following command in the USS shell.
pax -ppx -rf <zowe-V.v.p>.paxzowe-V.v.p
Specifies the name of the PAX file you downloaded. When extracting the Zowe convenience build, ensure that you include the-ppxargument that preserves the extended attributes.
This command expands to a file structure similar to the following example:
   /bin
   /components
   /files
   ...
This directory is the Zowe runtime directory, and is referred to as <RUNTIME_DIR> throughout this documentation.
Note: In Zowe v2, and Zowe v3 the contents of the expanded Zowe PAX file are the Zowe runtime directory.
Step 3: (Optional) Add the zwe command to your PATH
The zwe command is provided in the <RUNTIME_DIR>/bin directory. You can optionally add this Zowe bin directory to your PATH environment variable so you can execute the zwe command without having to fully qualify its location. To update your PATH, run the following command:
export PATH=${PATH}:<RUNTIME_DIR>/bin
Replace <RUNTIME_DIR> with your Zowe runtime directory path. This replacement updates the PATH for the current shell. To make this update persistent, add the line to your ~/.profile file, or the ~/.bashProfile file if you are using a bash shell. To make this update system wide, update the /etc/.profile file. Once the PATH is updated, you can execute the zwe command from any USS directory.
Note:
For the remainder of the documentation, references to the zwe command assumes this update to your PATH.
The zwe command has built-in help that can be retrieved with the -h option. For example, type zwe -h to display all of the supported commands. These are broken down into a number of sub-commands:
zwe -h
 ...
Available sub-command(s):
  - certificate
  - components
  - config
  - diagnose
  - init
  - install
  - internal
  - migrate
  - sample
  - start
  - stop
  - support
  - version
Step 4: Copy the zowe.yaml configuration file to preferred location
Copy the template file <RUNTIME_DIR>/example-zowe.yaml file to a new location, such as /var/lpp/zowe/zowe.yaml or your home directory ~/.zowe.yaml. This file is your configuration file that contains data used by the zwe command throughout the lifecycle of configuring and starting Zowe. Modify the zowe.yaml file based on your environment.
When you execute the zwe command, the -c argument is used to pass the location of the zowe.yaml file.
To avoid passing --config or -c to every zwe commands, you can define the ZWE_CLI_PARAMETER_CONFIG environment variable pointing to the location of zowe.yaml.
Example of defining the path:
export ZWE_CLI_PARAMETER_CONFIG=/path/to/my/zowe.yaml
Once the path is defined, it is possible to enter zwe install as a substitute for the full command zwe install -c /path/to/my/zowe.yaml.
Step 5: Install the MVS data sets
After you extract the Zowe convenience build, run the zwe install command to install MVS data sets.
About the MVS data sets
Review the list of datasets and members in a Zowe installation in the Server Datasets Appendix.
Procedure
The high level qualifer (or HLQ) for these data sets is specified in the zowe.yaml section below. Ensure that you update the zowe.setup.dataset.prefix value to match your system.
zowe:
  setup:
    # MVS data set related configurations
    dataset:
      prefix: IBMUSER.ZWEV3
To create and install the MVS data sets, use the command zwe install.
- In a USS shell, execute the command
zwe install -c /path/to/zowe.yaml. This creates the data sets and copies the data set content. - If the data sets already exist, specify
--allow-overwritten. - To see the full list of parameters, execute the command
zwe install -h.
The following example illustrates a sample run of the command using default values.
Example:
#>zwe install -c ./zowe.yaml
===============================================================================
>> INSTALL ZOWE MVS DATA SETS

Create MVS data sets if they are not exist
Creating Zowe sample library - IBMUSER.ZWEV3.SZWESAMP
Creating Zowe authorized load library - IBMUSER.ZWEV3.SZWEAUTH
Creating Zowe load library - IBMUSER.ZWEV3.SZWELOAD
Creating Zowe executable utilities library - IBMUSER.ZWEV3.SZWEEXEC

Copy files/SZWESAMP/ZWESIPRG to IBMUSER.ZWEV3.SZWESAMP
...
Copy components/launcher/samplib/ZWESLSTC to IBMUSER.ZWEV3.SZWESAMP
Copy components/launcher/bin/zowe_launcher to IBMUSER.ZWEV3.SZWEAUTH
...
Copy components/zss/SAMPLIB/ZWESISCH to IBMUSER.ZWEV3.SZWESAMP(ZWESISCH)
...
Copy components/zss/LOADLIB/ZWESAUX to IBMUSER.ZWEV3.SZWEAUTH

-------------------------------------------------------------------------------
>> Zowe MVS data sets are installed successfully.
#>
Next steps
You successfully installed Zowe from the convenience build. However, before you start Zowe, it is necessary to complete several required configurations. The next step is Initializing Zowe z/OS runtime.