Onboarding existing Rest API Script
Onboarding existing Rest API Script
(WORK IN PROGRESS)
In this tutorial we consider how an organization with a product or tool with an existing Rest API can be rapidly Onboarded to Zowe™ by getting that product or tool registered with the API Gateway. This would then allow the product to be available from a central location and benefit from other Zowe API Mediation layer functionality. To do this we need a method for defining the service to the gateway
As the example product we are using a simple Spring Boot sample app that can be downloaded here: spring-boot-jzos-sample. If you have your own example skip the "Get your app running" section we can adapt your script for that.
Overview
Apart from accessing your API's centrally through the Gateway, the Gateway provides manifest information about all accessible API's in it's catalog. For our static definition this information is retrieved from api definitions stored in yaml files. Although these files are simple in structure they would add more complexity for your customers when it comes to installing your product. Therefore we have developed a script that you can include with your product to simplify the process.
The Api definition file
Key to registering your product to the gateway is the following file structure which is installed in the API mediation layer. It's not critical to understand everything here but provided for anyone who wishes to grasp every detail.
services:
    - serviceId: jzos # internal id for the service
      title: IBM z/OS jzos # Title as used in the Catalog information tiles
      description: IBM z/OS jzos REST API service # Title as used in the Catalog information tiles
      catalogUiTileId: jzos # internal id Catalog information tiles
      instanceBaseUrls:
        - https://host.my.com:2956/ # location of service
      homePageRelativeUrl:  # home page, leave blank if instanceBaseUrls is the same
      routedServices:
        - gatewayUrl: api/v1  # [api/ui/ws]/v{majorVersion} convention
          serviceRelativeUrl: jzos # added to location
      apiInfo:
        - apiId: com.ibm.jzos # internal id
          gatewayUrl: api/v1 # main reference
          version: 1.0.0 # version of API on Gateway
          documentationUrl: https://host.my.com:2956/swagger-ui.html # Applies if no swagger ui
          swaggerUrl:  https://host.my.com:2956/v2/api-docs # provides a link and generates swagger info

catalogUiTiles:
    jzos: # as per serviceId - internal id for the service
        title: z/OS jzos services # tile label
        description: IBM z/OS jzos REST services # tile description
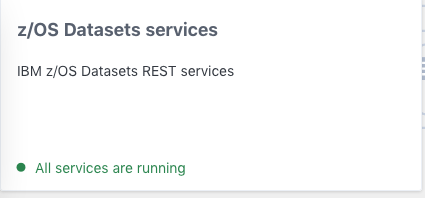
This information together creates the catalog tile information
By clicking on the tile the following information is presented. Note the swagger is generated from the swaggerUrl link which needs to be v2 swagger
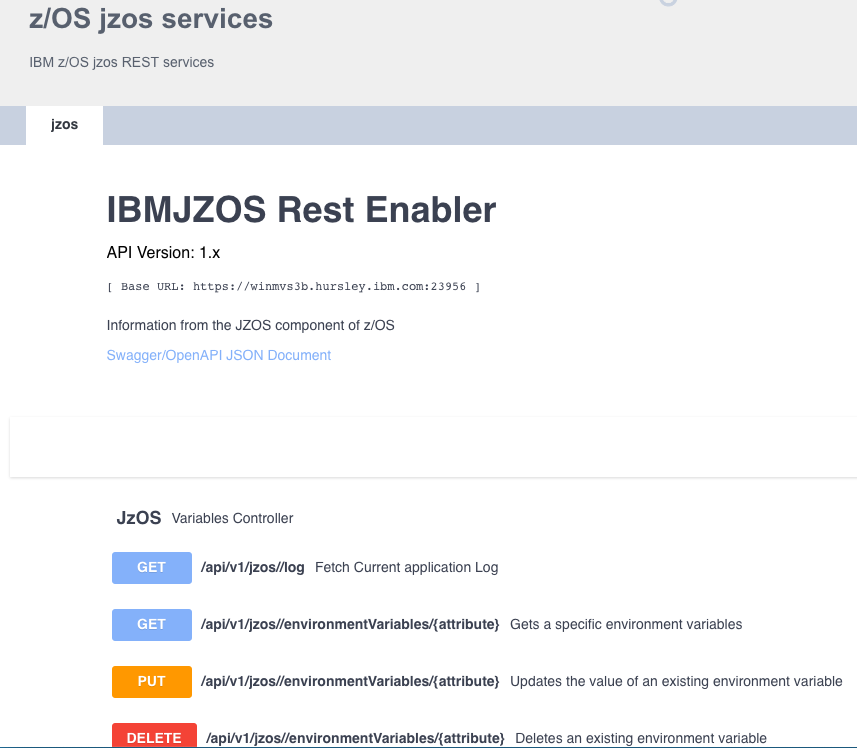
Although the most critical information, the redirection of the urls is under routed services along with the service id.
routedServices.gatewayUrl+serviceId will point at instanceBaseUrls+serviceRelativeUrl
<gateway url>/jzos/api/v1 ==> https://host.my.com:2956/jzos
Getting the sample app running
If you are using the sample follow the instructions in the readme to get it up and running on your z/OS machine. If using your own go to section 2. The sample generates swagger 2 documentation.
Modifying the Gateway script
As described earlier we are registering our application with the API Catalog by way of a file that is read by the Gateway when it's started. We think of this as a static definition as the details of the service won't change whilst the gateway is running. To achieve a more dynamic relationship between the application and registry, one that can respond to changes in one or the other e.g. for load balancing purposes we need to construct the product differently. See Onboarding from scratch.
The information contained in the yaml definitions file abover requires input from both the onboarding organization (you) and the end user. Therefore the intent is to provide as much of the onboarder information into the script template so the end user has fewer choices to make. Therefore the script should be updated.
The following fields need to be set
################################################################################
# The following fields to be filled in by implementing extenders team
################################################################################
defaultServiceId="xtdrsvcid" 	# lowercase only
defaultTitle="Product name"
defaultDescription="Product description"
defaultCatalogUiTileId="xtdrCatalogUiTileId"
defaultHomePageRelativeUrl="" # Usually home page is the same as the base URL

defaultGatewayUrl1="api/v1"
defaultServiceUrl1="api/v1/xtdrServiceId"
defaultGatewayUrl2="ui/v1"
defaultServiceUrl2="ui/v1/xtdrServiceId"
# Additional gateway and services will require further changes to script later

defaultApiId="no.id.ea"
defaultGatewayUrl=$defaultGatewayUrl1
defaultApiVersion="1.0.0"

defaultCatalogTileTitle="My Product in catalog"
defaultCatalogTileDescription="My Product description in catalog"
defaultServiceId
This field is an internal identifier that needs to be unique across product instances. Therefore if you install multiple instances of your product this will also need to be incremented. Note it must be lowercase and is also used as part of the gateway uri
defaultTitle
defaultDescription
defaultCatalogUiTileId
This is the name that appears on the tab of the opened service
defaultHomePageRelativeUrl
If the home page is not same as the base url add it in here
defaultGatewayUrl(n)
This is the the gateway url that you want your redirect to work from. You can create several defaultGatewayUrl/defaultServiceUrl pairings. Normally this would cater for api, web socket (ws) and ui.
defaultServiceUrl(n)
The target url of the service
defaultApiId
An internally used id. Suggest using com.co.yourprod etc.
defaultGatewayUrl
Main url redirection for documentation
defaultApiVersion
Version number of API if you wish to use it
defaultCatalogTileTitle
The title that is displayed in the catalog pages
defaultCatalogTileDescription
The description that is displayed in the catalog pages
How the Script works
Your updated shell script can now be run. This is how the process will appear to the end user.